Adobe Photoshop Tutorials, Tips and Tricks
|
||||||||||||
Dragon, Snake and Reptile Scales and SkinOne of the things I like best about Photoshop is that you can get it to do work for you that would otherwise be very tedious. Imagine doing artwork involving a dragon, dinosaur, snake or other type of reptile that has a scaly skin texture. Drawing and coloring all those scales would be very time consuming and rather monotonous. Fortunately, there's a way to get Photoshop to generate reptile scales for you without any drawing or painting by hand. Below is a view of the final product we'll be making in this tutorial, and not a single thing is painted or drawn by hand. It's all completely generated using the built-in tools in Adobe Photoshop. Intrigued? Then read on and learn the secrets!
|
| |||||||||||
1Set the background color to a dark color that will appear between the scales. I chose #8f2a00 for mine which is a sort of brick red color. Now create a new document. I made mine 500 x 500 pixels, but you can choose any size you want. Set the contents to be the background color:
Your document will now look like this:
2Now we'll create a new layer which will have the main foreground colors of the scales. To make it a little more interesting, I'm going to use a gradient so that the color is darker on the top than on the bottom, similar to how a real reptile or dinosaur would look. So first create a new layer by clicking on the
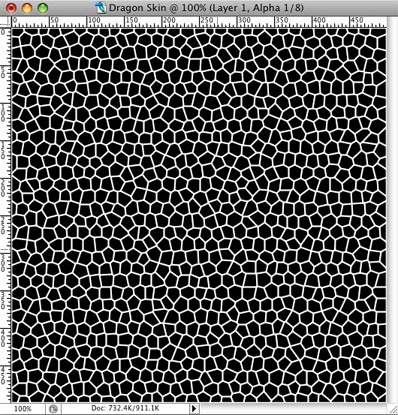
3Now it's time to make the scales pattern for the dragon or reptile skin using the Stained Glass filter in Photoshop. To get started, go the Channels Palette and create a new alpha channel by clicking on the new channel
You can of course vary the cell size and border thickness to suit your needs, but leave the light intensity setting at zero. 4Now we're going to use the alpha channel we just created to knock-out space on our foreground color layer in order to let the background color layer show through. First, load the alpha channel as a selection by clicking on the
There are of course other ways to overlay the dragon or dinosaur scale pattern onto the our foreground color layer, however we specifically want to delete the pixels between the scales for the reasons described in the next step.
|
||||||||||||
5Now that we have the basic color and pattern we want, it's time to make it look like real scales that might appear on a dragon, dinosaur or other reptile. Fortunately, we can do this quite easily with a layer style. This will add a little three dimensionality to it along with a lighting effect to make the surface of the scales seem real. The scales will have a bit of a gloss to them just like you would see on a snake, for example. Back in the previous step, we deleted the pixels between the scales for another reason in addition to letting the background color layer show through. The reason has to do with the way layer styles work on the pixels within a layer. When you use styles such as drop shadow and the bevel and emboss features, Photoshop applies these effects to every edge in the layer. The edges are determined by where ever there are missing pixels in that layer, so by deleting the pixels between the dinosaur scales, Photoshop will apply the layer style effects to each individual scale for us. This is a key element of this technique and is how we get Photoshop to do all the work of creating highlights and shadows on each scale for us. Trying to paint on all these highlights and shadows by hand would have been a tremendous amount of work, but it's all done for us once we get the layers properly set up. So let's see how this will work: We're going to have the light coming from the upper left, so we'll first add a subtle drop shadow to darken the lower right edges of the scales. Double-click the layer containing the foreground colors to open the layer styles dialog, select Drop Shadow and make these settings:
6Now select Bevel and Emboss and make the settings shown below. This adds a nice highlight and shadow to each scale in the layer and starts to bring out a three dimensional effect.
7Next select Contour and make these settings:
The effect of these individual settings is subtle at times, but taken together they combine to make a very nice effect.
|
|
|||||||||||
|
|
||||||||||||
8Now we'll add a little texture effect. The pigment present in snake or dragon scales usually isn't completely consistent within any one scale, so we'll replicate that look using this setting and the next one in Step 9. Select Texture in the Layer Styles dialog and make these settings:
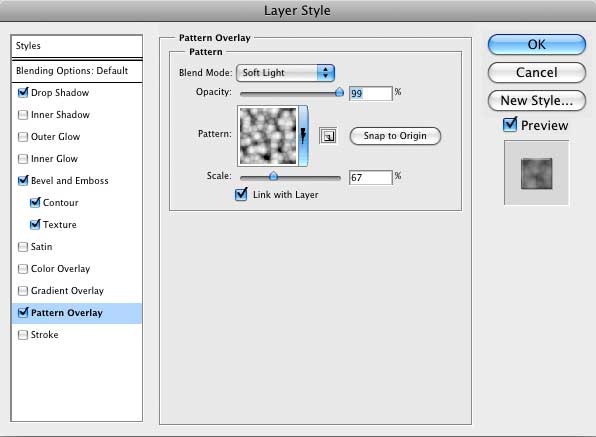
The pattern I selected is one of the built-in patterns in Photoshop called "Light Marble". Try some of the other patterns to see the effect it has on the image. The effect of the Light Marble texture is to add some streaks of lighter color to the dragon scales and makes the coloration a bit more random looking which is how it would be in nature. 9Our last step is to further randomize the coloration a bit by using a Pattern Overlay. Try these settings:
The pattern I selected is called "Molecular" and this blurry looking pattern makes nice smooth color transitions between the scales and randomizes the color of our dragon, snake, dinosaur or reptile skin texture. And here's our final result:
Altogether a very nice scaly skin texture created in Photoshop without having to draw a single thing! |
||||||||||||
Thanks for visiting with the Photoshop Dragon.
Copyright © 2007-2010 Curt Schimmel. The contents of this web site may not be copied in any way without permission. Terms of Use and Privacy Policy. |