| |
Adobe Photoshop Tutorials, Tips and Tricks
|
|
| |
Boosting Color Saturation
Photoshop, of course, includes a color saturation adjustment (Image->Adjustments->Hue/Saturation) however sometimes it's range is too limited, and worse, with digital photos it tends to distort the colors if you use more than a little boost. Sometimes I have photos where I want to punch up the color without getting this distortion. This becomes more of an issue if you intend to print enlargements of your photos. Here's an example:
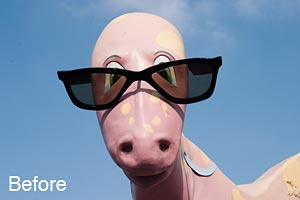
I took this photo during a visit to Disney's California Adventure theme park. It's a building in the shape of giant pink dinosaur who's wearing sunglasses. I like this photo, though the colors are a little weak in the original on the left. I want to boost the intensity of the colors without introducing any artifacts or distortions. Fortunately, there's another way to boost color saturation in Photoshop other than with the Hue/Saturation adjustment. This is done by converting the image from RGB to Lab color mode and then making the adjustments to the color channels there. This technique is quick and easy and produces great results.
Keywords: |
boosting/increasing color saturation/intensity, digital darkroom |
Features Used: |
Lab color mode, Levels adjustment |

|


|
| |
1
Open the image and convert it to Lab color mode by selecting Image->Mode->Lab Color. This changes the way the color and lightness information of the pixels is represented. It breaks the image down into three channels, Lightness, a and b (which is where Lab color mode gets its name), which we can see by clicking on the Channels tab.
The Lightness channel represents the brightness of each pixel. It's basically a pure black and white version of the image with no color information. All the color information for the image is represented in the a and b channels. The a channel stores the red/green information for each pixel, while the b channel stores the blue/yellow information. The a and b channels are both gray scale images. In these channels, the value of 50% gray is used to represent no color for the corresponding pixels. In the a channel, pixels which are less than 50% gray represent green and pixels greater than 50% gray represent red. The degree of red or green is determined by how far it is from 50% gray. In the b channel, pixels less than 50% gray represent blue, and pixels greater than 50% gray represent yellow. So for example, dark pixels in the b channel represents areas where there is a lot of blue in the image. By adjusting the grayscale values in the a and b channels, we can change intensity of the colors in the overall image. The advantage of this is that we can adjust the colors channels separately from the Lightness channel, which means we can change the color without affecting overall brightness, and this is one of the things that helps avoid introducing artifacts. |
|
2
Select the a channel to begin and make sure it's the only one highlighted as shown to the right. When you select this, you'll see the gray scale information in the a channel displayed in the main window. It sort of has the look of a negative, though it's not quite the same thing.
|
|
|
| |
|
|
| |
3
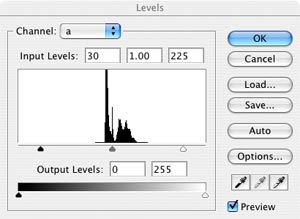
Now we will boost the color by making the dark pixels in the channel darker and the light pixels lighter. By increasing the contrast between the light and dark pixels in the channel, this has the effect of intensifying the color since the pixel values are being moved farther away from 50% gray. This can be done with a simple Levels adjustment (Image->Adjustments->Levels).
We don't want to cause a color shift, so we want to change the levels equally on both ends of the scale. For this reason, it's best to enter numeric values into the Input Levels fields rather than move the sliders. For this particular photo, I found that adding 30 to the black level value and subtracting 30 from the white level value produced the results I wanted. You can vary this amount as needed in the photo, but make sure you add and subtract the same values on both ends otherwise a color shift will occur. Be sure to leave the mid point value alone (i.e., leave it at 1.00).
Click OK to apply the change |
 |
4
Now select the b channel and again bring up the Levels adjustment. Make the same change as above using the same values to prevent a color shift. Click OK to apply.
|

|
| |
|
| |
5
Now that the color values are all uniformly modified, click on the Lab channel to view the full color image and observe the results. If the color saturation is too much or too little, just undo the two Levels adjustment and do them over with different values. Using this technique, you can make some pretty extreme color intensity changes, however usually only a little is sufficient. I frequently add just a touch of extra saturation by using a value of 5 or 10 for the black point and 255 or 245 for the white point.
If you want, you can convert your photo back to RGB mode by selecting Image->Mode->RGB Color when you're done.
|
| |
Thanks for visiting with the Photoshop Dragon.
More Tutorials
Enjoy this tutorial?
If so, please consider making a donation. This site is run as a hobby and your donation will help defray the costs and allow more tutorials to be added.
You can also support this site by trying a free Netflix trial. Just click the link to the right. You get a free trial and this site receives a donation from Netflix.
Planning to buy something from amazon.com or Barnes & Noble? Before you begin your purchase, click one of the links to the right first, then place the items you want in your shopping cart. You pay the same prices you would anyway and this site receives a donation from these retailers. It's easy! |
|
|
|
Copyright © 2007-2010 Curt Schimmel. The contents of this web site may not be copied in any way without permission. Terms of Use and Privacy Policy. |


