Adobe Photoshop Tutorials, Tips and Tricks
|
||||||||||||
Make a Cool Shiny Satin Metal EmblemFor this free Photoshop tutorial we will learn how to convert a simple clip art image of a dragon into a very cool looking metallic emblem with a smooth shiny satin finish. We will learn how to use Layer Styles to create the necessary lighting effects that make a surface look polished and metallic. The techniques we'll be learning can be applied to any type of image from clip art or other sources. This is an easy tutorial that anyone who understands how the basic tools in Photoshop work can follow along with, and it creates a very impressive and stunning result. As with all the tutorials here, no drawing or artistic skills are required, so anyone can join in and have fun creating some great looking images. Ready to get started? Here's what our final product will look when we're done:
|
| |||||||||||
1First choose the image you want to work with. Any type of image or photo that can be turned into a recognizable silhouette can be used. The color of the image doesn't matter since we're only going to be using the outline of the image to create our metal emblem. For obvious reasons, I of course chose a dragon which I found in a collection of clip art images I have. Here's the clip art image I'm starting with. If you're a Mac user, you can simply drag the image from your browser and drop it onto the Photoshop icon in your dock to open it in Photoshop. If your browser or operating system don't support that, click the link below to download a copy.
2Most clip art is distributed as a gif or png file just as the one above. These store images in the "indexed color" mode which generally limits them to 256 colors. This is done to reduce the file size without losing image quality for images that have very limited colors in them. For our work, we'll need many colors than that, so convert the image to the RGB color mode by selecting that option from the Image > Mode menu as shown here. Note that you can tell an image is in indexed color mode because Photoshop adds the word "Index" to the title bar on the image window and also has "Indexed Color" checked in the menu as we see here.
Generally, any time you open an indexed color image in Photoshop, you'll immediately want to convert it to RGB mode. Not only does this get you more colors to work with, but many of Photoshop's essential features, such as layers, are not available for indexed color images. 3In order to apply a Layer Style to an image, which is how we're going to achieve some of our effects in this tutorial, the image needs to be separated from the background and isolated on its own layer with transparent pixels where the background used to be. This is because Layer Styles work mostly on the edges of the image, so the image needs to be isolated with transparent pixels around it so Photoshop knows where the edges are. Fortunately, when dealing with black and white clip art, this is easy to do. First, select the Magic Wand tool
Before we go on, we'll want to deselect the dragon image by pressing Cmd-D (control-D on Windows). 4Let's get our background in place next. Click on the New Layer icon
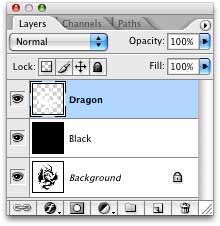
5Next we'll get our image set up on its own layer. Create another new layer above the Black layer and we'll name this one "Dragon". Now bring back the selection we saved in Step 3 by choosing Select > Load Selection and selecting the channel we created previously as so:
Now fill it in using Edit > Fill. This time use White for the Contents. The color actually doesn't matter since we're going to replace all the color in this layer with a Layer Style. We'll just use white for now so we can see the image on the black background. At this point, your Layers Palette should look like this:
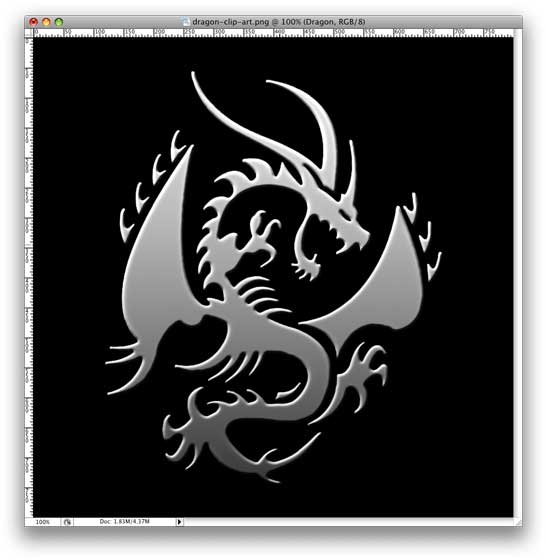
And your image should look like this:
|
||||||||||||
6Now we'll add a set of Layer Styles to convert this flat piece of clip art into a metallic looking emblem or medallion that has a three dimensional look. We'll use a number of different settings which simulate the look of different lighting effects on metal objects. The first thing we'll do is to replace the color in the layer using a Gradient Overlay. When the opacity is set to 100% as we have done here, the overlay completely covers all the colors in the layer. This is why it didn't matter what color we used when we initially filled the layer. With the angle set to 90 degrees, the gradient will create a top to bottom lighting effect for us that is one component of how light reflects off metal surfaces. If you look at real metal surfaces, the light reflected off of then is pretty much always uneven, so the gradient helps re-create that look. This is especially true of polished surfaces that have a satin finish. Also, by creating a sense that the light is stronger at the top than it is at the bottom, it helps sell the illusion that the emblem is three dimensional. To get started setting the Layer Style, select Layer > Layer Style > Gradient Overlay, or you can double click the Dragon layer in the Layers palette as a shortcut to opening the Layer Styles dialog. Here are the settings to use:
The Bevel and Emboss style is next which rounds off the edges and gives the illusion of a light source coming from the upper left. This will help make the emblem stand out from the background:
We'll add the Satin settings next. This creates an additional tone in the center portions of the image but leaves the edges alone. This helps create the look of a smooth, satin surface to the metal. Try these settings and note that the color in the Structure section is pure black:
Lastly, we'll add an Inner Shadow. By setting the color to white, we'll use this style to add an additional highlight to the emblem/medallion, enhancing the effect of a light shining off the surface of the metal. Highlights and shadows are important when re-creating the look of any surface in Photoshop. Be sure to set the color in the Structure section below to pure white.
At this point, we have created some nice lighting effects and our metallic dragon emblem should look like this:
|
|
|||||||||||
7
8For the glow, I want it to follow the shape of the dragon, so we'll use the selection of the image we created back in Step 3 as a template for the glow. So let's reload that selection again using Select > Load Selection as we did back in Step 5. I want the glow to be bigger than the dragon itself and have the edges fade into the background. We'll accomplish that effect by first expanding the selection. So use Select > Expand and expand by 10 pixels. Now set the foreground color to a nice intense shade of red. I used color #e80000. Select the Paint Bucket tool To feather it out and give it a misty look, we'll apply Filter > Blur > Gaussian Blur. Use a radius of 20 pixels. Lastly, I dialed the opacity of this layer down to 82% to fade it into the background a little more so that the red wouldn't distract from the dragon itself. Here's what we have at this point:
9I'd like to make the dragon stand out more from the red on the background and make the whole image more three dimensional. We'll do that by adding a Drop Shadow to the dragon image. So double-click the Dragon layer in the Layers palette to open the Layer Styles dialog for that layer again and make these settings:
10As a last little touch, I want to make the dragon's eye glow bright red. We'll just paint this in by hand, and since the eye is so small, let's zoom in on it to make it easier to paint just what we want. Select the Zoom Tool We want the paint for the eye to be on top of everything else, so select the Dragon layer in the Layers palette and click the New Layer icon
When you're done painting, it should look something like this:
Now return to 100% normal size by double-clicking the Zoom Tool icon Our smooth satin finish metallic dragon emblem is now complete:
|
||||||||||||
Thanks for visiting with the Photoshop Dragon.
Copyright © 2007-2010 Curt Schimmel. The contents of this web site may not be copied in any way without permission. Terms of Use and Privacy Policy. |


